Installing the JAMS Web Client Silently
Silent installation lets you install the JAMS Web Client from the command line without stepping through the installer wizard. Use this method when deploying the JAMS Web Client as part of a scripted or automated process, such as server provisioning or repeatable environment setup.
This topic covers new installations only. Silent installation does not support upgrade scenarios.
Installation Overview
- Before You Begin
- Prepare the Configuration File
- Run the Silent Installer
- After Installation: Required Manual Configuration
- Troubleshooting
Before You Begin
-
You must run the command prompt as an Administrator. Right-click the Command Prompt shortcut and select Run as administrator. The installation will fail if launched without elevated privileges.
-
The JAMS installer file (
JAMS-Setup-\<version\>.exe) must be downloaded to the server where you want to install the JAMS Web Client. Run the installer on that same server. -
You must have an existing SQL Server instance accessible from the installation server. You need the following before you begin:
- Server name\Instance name, such as SQLSERVER01\SQLEXPRESS
- The name of the JAMS database.
-
If you plan to use SQL Server authentication (username and password) instead of Windows integrated authentication, have those credentials available.
-
If you are providing an external configuration file, create and save the JSON file before running the installer. See Prepare the Configuration File below.
-
The JAMS Web Client requires .NET 10. If it is not installed, the installer displays a message and will attempt to install it. If an internet connection is not available, you will need to manually download and install the correct .NET version. Go to the .NET 10 download site to download the correct version.
The JAMSBase database does not need to exist before you run the installer. If JAMSBase does not exist and allowCreate is set to true in the configuration file, the installer creates it automatically. If allowCreate is set to false, the installer validates against the database you specify and stops with an error if that database does not exist.
Preparing the Configuration File
The installer reads database and installation settings from a JSON configuration file that you provide. If you do not provide a configuration file, the installer uses a default embedded configuration. In most deployment scenarios, you will want to supply your own configuration file to specify the correct database server and instance for your environment.
- Create a plain text file with a
.jsonextension and populate it using the structure below. - Save the file to a location accessible from the server where you are running the installer, such as
C:\temp\jams-config.json.
{
  "installationPath": "C:\\Program Files\\JAMS",
  "mainJamsDatabase": {
    "server": "SQLSERVER01\\SQLEXPRESS",
    "database": "JAMS",
    "authentication": "integrated",
    "username": "", "password": ""
  },
  "webClientDatabase": {
    "server": "SQLSERVER01\\SQLEXPRESS",
    "database": "JAMSBase",
    "authentication": "integrated",
    "username": "",
    "password": "", "allowCreate": true }
}
Configuration File Fields
-
installationPath— Optional. The directory where JAMS Web Client is installed. If omitted, the installer uses the default path:C:\Program Files\JAMS. -
mainJamsDatabase— Required. Connection settings for your existing JAMS database.server— The SQL Server hostname and instance name (for example,SQLSERVER01\SQLEXPRESS).database— The name of the JAMS database.authentication— Useintegratedfor Windows authentication, orsqlfor SQL Server authentication.username/password— Required when using SQL Server authentication. Leave blank when using integrated authentication.
-
webClientDatabase— Required. Connection settings for the JAMSBase database used by the JAMS Web Client.-
allowCreate— Controls whether the installer creates JAMSBase if it does not exist.true— The installer checks at the server level and creates JAMSBase automatically if it is not found.false(default) — The installer validates against the database name you provide and stops with an error if that database does not exist.
-
If the configuration file contains invalid database settings, such as an unreachable server or a missing required field, the installer stops immediately and writes an error to the log. Verify your settings before running the installer.
Running the Silent Installer
- Open a command prompt as an Administrator.
- Navigate to the directory containing JAMS-Setup-<version>.exe.
- Run the installer using the following command format:
JAMS-Setup-<version>.exe --am --al --confirm-command install Mode=silent ConfigPath=C:\temp\jams-config.json LogPath=C:\Temp\installer2.log
Replace <version> with the actual version number in your installer filename. Omit any parameters that do not apply to your deployment.
- Wait for the installation to complete. When the process finishes successfully, the console displays a Components installed successfully message. If the installation fails, the console and log file both contain a description of the failure.

Command Examples
Install using an external configuration file:
JAMS-Setup-<version>.exe --am --al --confirm-command install Mode=silent ConfigPath=C:\temp\jams-config.json
If the configuration file path contains spaces, quote the full argument value:
JAMS-Setup-<version>.exe --am --al --confirm-command install Mode=silent ConfigPath="C:\Install Files\jams-config.json"
Override the installation directory from the command line (this takes precedence over installationPath in the configuration file):
JAMS-Setup-<version>.exe --am --al --confirm-command install Mode=silent ConfigPath=C:\temp\jams-config.json TargetDir="C:\Program Files\JAMS Web"
Specify a custom log file location:
JAMS-Setup-<version>.exe --am --al --confirm-command install Mode=silent ConfigPath=C:\temp\jams-config.json LogPath=C:\temp\jams-web-install.log
Command-Line Parameters
--am- Automatically accepts all installer message boxes (such as overwrite directory prompts) using their default response. This prevents the installer from pausing for interactive confirmation during a scripted run.--al- Automatically accepts the license agreement prompt so the installer does not pause at the console waiting for input.--confirm-command- Suppresses the confirmation prompt that would otherwise appear before the install command executes.Mode=silent- Required. Runs the installation without displaying the installer wizard.ConfigPath=<path>- Optional. Path to your JSON configuration file. If omitted, the installer uses the embedded default configuration.TargetDir=<path>- Optional. Overrides theinstallationPathvalue in the configuration file. Use this to set the installation directory from the command line without editing the JSON file.LogPath=<path>- Optional. Path and filename for the installer log file. If omitted, the log is written to%TEMP%\JAMS\jams-install-<timestamp>.log.
After Installation: Required Manual Configuration
Silent installation does not complete the full JAMS Web Client setup on its own. After the installer finishes, you must manually configure the Gateway and add the Scheduler connector. The JAMS Web Client cannot connect to a JAMS Scheduler until this step is complete.
Optional - Changing the Gateway Port
By default, 443 is specified in the configuration files. If port 443 is unavailable or a different port is required, you can select a new port. Ensure you use this updated port in the sections below as they list 443 as the default.
Ensure the HTTPS port is the same in both configuration files in the procedure below. If a load balancer is used, update the load balancer listener and target group port accordingly.
- Open the JAMS Web Client installation folder at C:\Program Files\JAMS.
- Open the Shared folder and open the settings.json file.
- Update the port for both the "Url" and "InternalUrl" properties.
Example:
"Gateway": {
  "Url": "https://myserver:8443",
  "InternalUrl": "https://localhost:8443",
  "AllowSelfSigned": true
}
- Save and close the file.
- Open the JAMS Gateway folder in the Shared directory and open the settings.json file.
- Update the port in the "Urls" property.
Example:
{
  "Urls": "http://+:8080;https://+:8443"
}
- Save and close the file.
- Restart the following services on the JAMS Web Client machine:
- JAMS API
- JAMS Gateway
- JAMS Identity
- JAMS Web UI
Adjusting the Gateway Configuration Settings
Based on your environment, you may need to modify the Gateway configuration to ensure the JAMS Web Client is accessible. Review the procedure and table below to choose the option for your environment.
The Gateway Url must be the exact hostname that end users type in their browser. If they do not match, you will see an "Invalid redirect_uri" message when logging in.
-
Open the JAMS Web Client installation folder at C:\Program Files\JAMS.
-
Open the Shared folder and open the settings.json.
-
Make changes to the Url option in Gateway section based on your environment. Example values are shown below. If you changed the port in the previous section, ensure you use the updated value in the examples below.
Windows VM (Azure or AWS)
"Gateway": {"Url": "https://public-IPAddress:443","InternalUrl": "https://localhost:443","AllowSelfSigned": true}Requirements and Notes
- Enter the public DNS or IP address for the JAMS Web Client.
- Add an inbound security rule in Azure to allow inbound TCP 443.
- Update the Windows Firewall to allow inbound TCP 443.
Windows VM (Azure or AWS) with load balancer
"Gateway": {"Url": "https://myazure.centralus.cloudapp.azure.com:12345","InternalUrl": "https://localhost:443","AllowSelfSigned": true}Requirements and Notes
- Enter the load balancer public DNS name.
- The load balancer health probes must pass.
- The network security group must allow traffic from the load balancer to the VM.
Amazon EC2 instance via public DNS
"Gateway": {"Url": "https://ec2-11-222-33-44.compute-1 .amazonaws.com:443","InternalUrl": "https://localhost:443","AllowSelfSigned": true}Requirements and Notes
- Use the public IPv4 DNS for the EC2 instance.
- Update the AWS security group to allow inbound TCP 443.
- Update the Windows Firewall to allow inbound TCP 443.
Amazon EC2 instance via public IP
"Gateway": {"Url": "https://192.168.1.1:443","InternalUrl": "https://localhost:443","AllowSelfSigned": true}Requirements and Notes
- Update the AWS security group to allow inbound TCP 443.
- Update the Windows Firewall to allow inbound TCP 443.
- Auto-assigned public IPs change when the instance stops/starts. Use an Elastic IP if the address must be stable.
Amazon EC2 instance with load balancer
"Gateway": {"Url": "https://myapp-lb-123456789.us-east-1.elb.amazonaws.com:443","InternalUrl": "https://localhost:443","AllowSelfSigned": true}With a custom domain:
"Gateway": {"Url": "https://app.example.com","InternalUrl": "https://localhost:443","AllowSelfSigned": true}Requirements and Notes
- Enter the load balancer URL or the EC2 public DNS name.
- The load balancer must be internet-accessible (not internal).
- The target group must have healthy targets.
- The security group must allow traffic from the load balancer to the EC2 instance on port 443.
- If you have a custom domain, a DNS record (CNAME or Route 53 alias) must point to the load balancer DNS.
-
Save and close the file.
-
Restart the following services on the JAMS Web Client machine:
- JAMS API
- JAMS Gateway
- JAMS Identity
- JAMS Web UI
-
From another machine, open a browser and navigate to the updated URL to confirm access to the JAMS Web Client.
Configuring Secure Communication
To have secure communication between the JAMS Web Client and the JAMS Scheduler, a Listener must exist on the JAMS Scheduler and a Connector must be created manually on the machine where JAMS Web Client is installed.
- The JAMS Scheduler/JAMS Agent and JAMS Web Client are on the same server.
- The JAMS Scheduler/JAMS Agent and JAMS Web Client are on different servers.
Listener Configuration
A Listener is automatically created on the JAMS Scheduler machine as part of the installer.
Key Points:
- A Listener uses Port 5773, which must be open between the JAMS Web Client and JAMS Scheduler.
- Only one Listener can be created per JAMS Scheduler.
- A Listener requires a root Certificate Authority, which is created by the installer.
Connector Configuration
Key Points:
- A Connector must be created manually on the JAMS Web Client machine after the Listener is created.
- A Connector is created by manually running the ADD SCHEDULER CONNECTOR command in the JAMSRegister application as described in the sections below.
- Running the command requests a new certificate from the JAMS Server and stores it in the local machine store.
- It also creates a SchedulerClient.config that is used by the JAMS Web Client.
- If you change the location for the /CONFIGFOLDER, you will need to copy the SchedulerClient.config file to the JAMS API folder.
If you are recreating the Connector, delete the existing SchedulerClient.config first.
Before You Begin
Before you begin, confirm whether your JAMS Scheduler and JAMS Web Client are installed on the same server or on separate servers. The steps differ between these two configurations.
Opening port 5773 is a network or firewall configuration task. Confirm with your network or infrastructure team that this port is open between the JAMS Web Client and JAMS Scheduler before proceeding with the connector setup below.
Verify the Root CA and Scheduler Listener are on the JAMS Scheduler
-
Go to the JAMS Scheduler server.
-
Open C:\Program Files\MVPSI\JAMS\Scheduler.
-
Right-click JAMSRegister.exe and select Run as Administrator.
-
Run the command below to list the root CA and the Listener.
LIST SCHEDULER CONFIGURATION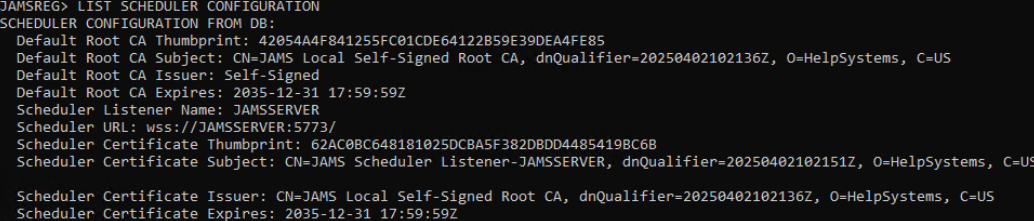
-
The lines starting with "Scheduler" are the important ones, and they indicate that the Listener is set up. In most cases, the "Scheduler Certificate Issuer" should be identical to the "Default Root CA Subject".
noteIf there are no Scheduler lines, you need to run the following command in JAMSRegister:
ADD SCHEDULER LISTENER /NEWCERT
You will need to restart the JAMSScheduler service to apply this change. -
Follow the steps in the section below that applies to your environment.
Option 1: Setting up the Connectors when the JAMS Scheduler/JAMS Agent and JAMS Web Client are on the same server
-
Go to the JAMS Scheduler server or JAMS Agent server.
-
Open C:\Program Files\MVPSI\JAMS\Scheduler or C:\Program Files\MVPSI\JAMS\Agent.
-
Right-click JAMSRegister.exe and select Run as Administrator.
-
Run the command below in JAMSRegister to add the Connector and create the SchedulerClient.config file.
Ensure you update the /SERVER value and provide the path to JAMS API folder using /CONFIGFOLDER Parameter. The default path is used in the example below. If you change the location for the /CONFIGFOLDER, you will need to copy the SchedulerClient.config file to the JAMS API folder.ADD SCHEDULER CONNECTOR /REQCERT /SERVER=<TargetJAMSSchedulerServerName> /CLIENTNAME=WebClient /CONFIGFOLDER="C:\Program Files\JAMS\JAMS API" -
Verify the SchedulerClient.config file was created by running the command below.
LIST CLIENT CONFIGURATION /CONFIGFOLDER="C:\Program Files\JAMS\JAMS API"
- A successful result shows both a
Client Configurationline and aConnector Certificate Issuerline. If only theClient Configurationline appears, the connector was not created successfully — run the ADD SCHEDULER CONNECTOR command again. - Verify the "Connector Certificate Issuer" is identical to the "Scheduler Certificate Issuer" displayed in the step from Verify the Root CA and Scheduler Listener are on the JAMS Scheduler.
- A successful result shows both a
-
Open the Windows Services application and restart the JAMS API service.
Option 2: Setting up the Connectors when the JAMS Scheduler/JAMS Agent and JAMS Web Client are on different servers
-
On the JAMS Scheduler server, create a temporary folder, such as c:\TEMP.
-
Open C:\Program Files\MVPSI\JAMS\Scheduler.
-
Right-click JAMSRegister.exe and select Run as Administrator.
-
Run the command below to export the root Certificate Authority into a file in the c:\TEMP folder.
EXPORT ROOT CA /FILENAME="c:\TEMP\root.cer" -
Run the command below to create a SchedulerClient.config file in the c:\TEMP folder.
ADD SCHEDULER CONNECTOR /REQCERT /SERVER=localhost /CLIENTNAME=WebClient /CONFIGFOLDER="c:\TEMP" -
Open the SchedulerClient.config file from c:\temp and copy the thumbprint value from the "Thumbprint": property because it is needed for the next step. The thumbprint is a 40-character hexadecimal string, for example:
A1B2C3D4E5F6A1B2C3D4E5F6A1B2C3D4E5F6A1B2. Copy the value only, without the surrounding quotation marks. -
Run the command below to export the certificate by thumbprint.
Ensure you update the value for the /THUMBPRINT.EXPORT SCHEDULER CONNECTOR CERTIFICATE /FILENAME="c:\TEMP\connector.cer" /THUMBPRINT=<The thumbprint taken from SchedulerClient.config> /PROMPT -
When prompted, enter a password to protect the certificate. You will need this password when importing the certificate on the JAMS Web Client machine in a later step. Confirm the password when prompted.
-
Create a zip file of the files in the TEMP folder, including the root.cer, SchedulerClient.config, and connector.cer files.
-
Transfer the zip file to the JAMS Web Client machine using your preferred method, such as a shared network path. Unzip the contents to a temporary location on that machine.
-
Copy and paste the SchedulerClient.config file into C:\Program Files\JAMS\JAMS API.
-
Open the certlm tool "Manage Machine Certificates".
-
Import the root.cer file into the "Trusted Root Certification Authorities" Certificates folder.
-
Import the connector.cer file into the “Personal” Certificates folder.
-
Enter the password you entered when exporting the file in a previous step.
-
Open the Windows Services application and restart the JAMS API service.
Verifying the Installation
- Check the console output or log file for the completed successfully message. If you see this message, the installer finished without errors.
- Open the JAMS Web Client in a browser and confirm that it loads and connects to the JAMS Scheduler.
- If the installation did not complete successfully, review the log file for the failure description. The log file is located at the path you specified with
LogPath, or at the default location:%TEMP%\JAMS\jams-install-<timestamp>.log.
For common failure scenarios and resolutions, see Troubleshooting.
Troubleshooting
- Installation stops with a database error. Verify that the SQL Server instance is reachable from the installation server and that the database names in your configuration file are correct. If
allowCreateisfalseand JAMSBase does not exist, the installer will stop. SetallowCreatetotrue. - Installation stops with a .NET error. The installer attempts to install .NET automatically. If this fails, install the required .NET version manually and then rerun the JAMS installer.
- The installer does not start or exits immediately. Confirm that you opened the command prompt using Run as administrator. The installer requires elevated privileges and will not run without them.
- The JAMS Web Client loads but cannot connect to the JAMS Scheduler. Confirm that you completed the Gateway configuration and added the Scheduler connector as described in After Installation: Required Manual Configuration. This step is required and is not performed by the installer.
- No log file found at the default location. Search for
jams-install-*.login your%TEMP%\JAMS\folder. If the folder does not exist, the installer may have failed before it could write the log. UseLogPathto specify an explicit log location on your next attempt.