JAMS Agent Interactive for Windows
Overview
The JAMS Agent Interactive is an incoming Agent that is used to run Jobs that require interactive access to the Windows Desktop. This can include the integration for JAMS with Automate Desktop, if the Task requires interactive desktop access. If the Task requiring interactive access runs on a local/remote Agent that is not JAMS Agent Interactive, the Job may stay in the "executing" state.
The JAMS Agent Interactive was created to automate applications. As a best practice, use a dedicated PC for this automation because Jobs can open and manipulate application windows. When a Job is running, you should avoid using this PC because it may disrupt the automated Job.
All Jobs running on this Agent run as the logged in or specified user, regardless of the ExecuteAs Credential for the Job.
The JAMS Agent Interactive runs as an application in the Windows taskbar notification area. You can right-click the icon to see the options listed below.

| Option | Description |
|---|---|
| Scheduler Connections | View, add, or manage connections to a JAMS Scheduler. When you add a connection, an incoming Agent is also created on the specified JAMS Scheduler. |
| About | View version information about the JAMS Agent Interactive. |
| JAMS Support Website | Access the JAMS Support website site for more information. |
| Agent Documentation | Access the documentation for the JAMS Agent Interactive within JAMS Help. |
| Agent Log | View the log file for this Agent. |
| Disable application start on login/Automatically start application on login | Enable or disable the JAMS Agent Interactive from starting when you log in to the machine. The text that is displayed varies based on the current state of this option. By default, the application automatically starts on login after you create a connection to a JAMS Scheduler as described in the section below. |
| Exit | Close the JAMS Agent Interactive. |
Installing the JAMS Agent Interactive
If you are integrating JAMS with Automate Desktop, install the JAMS Agent Interactive on the same machine as Automate Desktop.
- On the JAMS Agent machine, right-click the JAMS installer and select Run as Administrator.
- Follow the prompts until you see the Integration Pack page.
- Select JAMS Agent Interactive.
- Click Next.
- Follow the remaining prompts in the installer to complete the installation.
Opening and Closing the JAMS Agent Interactive
You can open the JAMS Agent Interactive by right-clicking the JAMS Agent Interactive icon and selecting Scheduler Connections.
To close the JAMS Agent Interactive, right-click the JAMS Agent icon and select Exit.
Setting up the JAMS Agent Interactive
After the JAMS Agent Interactive is installed, you can set up the connection to a JAMS Scheduler. The initial setup of the JAMS Agent Interactive includes configuring secure communication and adding connections to one or more JAMS Schedulers.
Follow the steps below for environments that do not use primary/secondary servers in a failover environment.
Setting up Secure Communication
The procedure needs to be done only once during this initial setup. Ensure you run the commands below as a local administrator.
If you already have a root certificate, do not run the create root ca command below. Otherwise, you will need to regenerate all of your certificates. You can check if you have a root CA by opening JAMSRegister.exe and running the list root ca /default command. This command also lists the thumbprint for the root CA.
- On the JAMS Scheduler, go to
\Program Files\MVPSI\JAMS\Scheduler. - Right-click JAMSRegister.exe and select Run as administrator. A command prompt window opens.
- Run the command shown below.
create root ca /storekey /makedefault - Run the command shown below.
ADD EXECUTOR LISTENER /NEWCERT /FW - Close the JAMSRegister.
Adding a Connection to a JAMS Scheduler
After the JAMS Agent Interactive has been installed, add a connection to the JAMS Scheduler. This process creates an Agent definition on the selected JAMS Scheduler with the ACL restricted to the user account specified in the Username field below. The Agent is named “MachineName-UserName” where the MachineName is the name of the machine where JAMS Agent Interactive is installed and the UserName is the user adding the connection.
If you do not specify a username and password, the JAMS Agent Interactive runs as the currently logged in user.
Ensure your credentials can connect to the JAMS Server as well as create and modify Agents within JAMS.
- Go to the Agent machine.
- In the Windows taskbar notification area, right-click the JAMS Agent Interactive icon and select Scheduler Connections.
- Click Add. The Add New Scheduler Connection dialog is displayed.
- In the Server Name field, enter the name of the JAMS Server. If you enter a valid server name, you do not need to enter an IP address in the Address field.
- In the Address field, enter the IP address or name of the JAMS Server, if necessary.
- In the Port field, keep the value as 773.
- In the Username field, enter the user name to connect to the JAMS Server. This account will also be used to create the incoming Agent.
- In the Password field, enter the password for the user name that you entered.
- Click Test Connection to verify the Agent can communicate with the JAMS Scheduler. A message is displayed to indicate if the connection was successful.
- Click Ok.
- If the server that you specified is on a different machine, you will see the message below. Click Yes to install the certificate from the specified server.
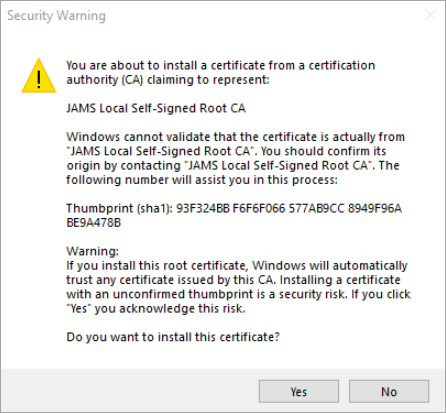
The JAMS Agent Interactive is now listed as an incoming Agent within the Agents option in the JAMS Client. You can repeat the steps above to add additional connections, if necessary. You can now set Jobs to run on this Agent.
Setting up JAMS Agent Interactive in a High Availability Environment
To configure JAMS Agent Interactive in a high availability environment, ensure the primary and secondary servers use a shared name that is specified in the /EXECNAME= command to create the certificate. This name is not the actual machine name. If a shared name is not specified, the machine name of the primary server is used.
For example, if you have two servers named PROD-JAMS-PRM and PROD-JAMS-SCN, you could use PROD-JAMS for the shared name.
Primary JAMS Scheduler
- On the primary JAMS Scheduler, go to
\Program Files\MVPSI\JAMS\Scheduler. - Right-click JAMSRegister.exe and select Run as administrator. A command prompt window opens.
- If you did not run the create root ca command from the previous section, run the command shown below. Otherwise, skip this step.
create root ca /storekey /makedefault - Note the thumbprint that is listed because you need this in the following step.
- Run the command shown below to export the certificate. You need to copy this to the Secondary JAMS Scheduler.
Export root ca /filename="C:\root.pfx" /prompt /thumbprint=<Insert the thumbprint of the certificate> - Enter a password to store the private key, which is referred to as the root key password and will be used in another step.
- Enter the password again when prompted to verify it.
- Run the command shown below:
Add Exec Listener /NEWCERT /EXECNAME=<Enter the shared name for the primary and secondary JAMS Scheduler> /ADDRESS=<Enter the network address or name for the primary server> /FW
The /ADDRESS is only needed if the machine name alone cannot specify the servers on the network. For example, you may need to enter the address if the servers are not within a company network.
- Close the JAMSRegister application.
- Copy the root.pfx file that you exported to the secondary JAMS Scheduler.
If you need to redo the Add Exec Listener command due to incorrect information, run the Remove Exec Listener command in JAMSRegister to remove the current listener. You can then run the Add Exec Listener command again.
Secondary JAMS Scheduler
- On the secondary JAMS Scheduler, go to
\Program Files\MVPSI\\JAMS\Scheduler. - Right-click JAMSRegister.exe and select Run as administrator. A command prompt window opens.
- Run the command shown below to import the certificate. Ensure you update the /filename command to specify the location where the file is saved.
Import root ca /filename=root.pfx /prompt /makedefault /storekey - Enter the root key password.
- Run the command shown below:
Add Exec Listener /NEWCERT /ADDRESS=<Enter the network address or name for the secondary server> /FW
JAMS Agent Interactive Machine
Add the primary JAMS Scheduler as a connection using the steps in the “Adding a Connection to a JAMS Scheduler” section.
Managing Scheduler Connections
Viewing Information for a Connection to a JAMS Scheduler
-
In the Windows taskbar notification area, right-click the JAMS Agent Interactive icon and select Scheduler Connections.
-
On the Scheduler Connections tab, select the connection that you want to edit.
-
Click Edit. The Edit Scheduler Connection dialog is displayed.
-
View the information in the Agent Information section. This section is read-only.
- Server Name is the name of the server that you entered when the connection was created.
- Address is the name or address of the selected server followed by the port number.
- Agent Name is the name of the Agent that includes the machine name and the user account that created the connection.
- Agent Thumbprint is the Agent thumbprint of the existing certificate that is used for communication. (The root certificate has a different thumbprint.)
-
Click Ok.
Requesting a New Certificate
You can create a new certificate from the JAMS Scheduler if the current certificate authority has changed or the certificate has expired.
-
In the Windows taskbar notification area, right-click the JAMS Agent Interactive icon and select Scheduler Connections.
-
On the Scheduler Connections tab, select the connection that you want to edit.
-
Click Edit. The Edit Scheduler Connection dialog is displayed.
-
View the information in the Agent Information section. This section is read-only.
-
In the Request New Certificate section, do the following:
- In the Server Name, view or change the JAMS Server that this Agent will use to request the new certificate. If you entered a server name and an address when the connection was initially created, the address is displayed in this field. If you entered only a server name, the name is displayed.
- In the Port field, keep the value as 773.
- In the Username field, enter the user name to connect to the JAMS Server.
- In the Password field, enter the password for the user name that you entered.
-
Click Request Certificate.
-
Click OK on the Request New Certificate dialog.
-
Click Ok.
A new certificate is created and stored for this Agent. The Agent Thumbprint on the Edit Scheduler Connection dialog is updated.
Removing a Connection to a JAMS Scheduler
- In the Windows taskbar notification area, right-click the JAMS Agent Interactive icon and select Scheduler Connections.
- On the Scheduler Connections tab, select the connection that you want to remove.
- Click Remove.
- Click Yes when prompted. The connection is removed.
As a best practice, you may want to remove the Agent from within the JAMS Client and review any existing Job Definitions that may specify this Agent.
Viewing Information about the JAMS Agent Interactive
Viewing Version Information for the JAMS Agent Interactive
- In the Windows taskbar notification area, right-click the JAMS Agent Interactive icon and select About.
- View the version numbers on the About screen.
Viewing the Log File for the JAMS Agent Interactive
If you need to view detailed information about the JAMS Agent Interactive, you can view the log file.
- In the Windows taskbar notification area, right-click the JAMS Agent Interactive icon and select Agent Log. The JAMSAgentInteractive log file is opened as a .txt file.
- Review the information listed in the log file.