Configuring Single Sign-On with Microsoft Entra ID (SAML2)
To configure single sign-on with Microsoft Entra ID (SAML2), you need to complete steps in both Azure and in the JAMS Web Client.
Complete the steps in all sections below to complete the setup.
1. Azure Configuration
1.1 Registering the Application in the Azure Portal
-
Go to the Azure Portal.
-
From the menu in the upper left corner, select Microsoft Entra ID.
-
Expand the Manage menu.
-
Click Enterprise applications.
-
Click New application.
-
Click Create your own application.
-
Configure the following items:
- In the Name field, enter JAMS Web Identity SAML (or your preferred name).
- Select Integrate any other application you don't find in the gallery (Non gallery).
-
Click Create.
1.2 Configuring SAML2
- Go to your enterprise application.
- Expand the Manage menu.
- Select Single sign-on.
- Select SAML. The Set up Single Sign-On with SAML screen is displayed with 5 sections.
- Go to the Basic SAML Configuration section and click Edit.
- In the Identifier (Entity ID) area, click Add identifier and enter your Entity ID address for the JAMS Web Client.
Example: https://public-IPAddress:443/. - In the Reply URL (Assertion Consumer URL) area, click Add reply URL and enter the Assertion Consumer Service URL. You can set the scheme for this URL. The scheme must only contain letters, numbers, an underscore, or a hyphen. Also, it must always start with a letter. In the example below, AzureSAML is used. You will need this scheme value when you configure the Identity Provider in the JAMS Web Client.
Example: https://public-IPAddress:443/Saml2/AzureSAML/Acs. - Click Save.
1.3 Configuring Attributes and Claims
- On the same screen, go to the Attributes & Claims section and click Edit.
- Click Add new claim.
- Enter onprem_sid as the name.
- Select attribute for the Source.
- Select user.onpremisesecurityidentifier for the Source Attribute.
- Click Save.
- Click Add new claim.
- Enter oid as the name.
- Enter http://schemas.xmlsoap.org/ws/2005/05/identity for the Namespace.
- Select user.objectid for the Source Attribute.
- Click Save.
- Click Add a group claim.
- Select Security groups.
- Select On Premises Group Security Identifier for the Source Attribute.
- Click Save.
- Configure the following claims:
| Claim | Source Attribute | Notes |
|---|---|---|
| http://schemas.xmlsoap.org/ws/2005/05/identity/claims/nameidentifier | user.userprincipalname or user.objectid | Unique user identifier (becomes sub) |
| http://schemas.xmlsoap.org/ws/2005/05/identity/claims/emailaddres | user.mail | User's email |
| http://schemas.xmlsoap.org/ws/2005/05/identity/claims/name | user.displayname | Display name |
| http://schemas.xmlsoap.org/ws/2005/05/identity/claims/givenname | user.givenname | First name |
| http://schemas.xmlsoap.org/ws/2005/05/identity/claims/surname | user.surname | Last name |
1.4 Note the Federation Metadata
You will need to copy and save some information from Azure because it is needed for the configuration in the JAMS Web Client.
- Go to the SAML Certificates section.
- Copy the App Federation Metadata Url.
Example: https://login.microsoftonline.com/12341234-5678-9012-3456-7890ab123456/federationmetadata/2007-06/federationmetadata.xml?appid=12341234-a567-b890-c1234-d4567890c421 - On same screen, go to the Set up <App Name> section.
- Copy the Microsoft Entra Identifier value.
Example: https://sts.windows.net/12341234-1234-1234-5678-90123456789a/
1.5 Assigning Users and Groups
- Click Users and groups from the menu.
- Click Add user/group.
- (Recommended) Search for and select a group that contains the users.
- Click Select.
- Click Assign.
Group claim limits with large Microsoft Entra group memberships
If a user belongs to more than 150 groups (SAML2) or 200 groups (OIDC), Microsoft Entra omits the groups claim from the token entirely. JAMS then treats that user as having no group memberships, and they will lose all group-based ACL access. To avoid this, configure the Entra app registration to emit only Groups assigned to the application rather than all of the user's groups. This keeps the emitted group count under Entra's limit.
2. JAMS Web Client Configuration
2.1 Adding the Microsoft Entra ID Identity Provider in the JAMS Web Client
After you have configured Azure, you can add the Identity Provider in JAMS.
- Click Access from the main menu.
- Click Identity Providers.
- Click Add.
- In the Provider field, select Microsoft Entra ID via SAML 2.0.
- In the Scheme field, enter the unique name for this Identity Provider that you set for the Reply URL (Assertion Consumer URL), such as AzureSAML.
- In the Display Name field, enter the text that you want displayed as the button text on the JAMS Web Client Log in screen. For example, you can enter Sign in with SAML2.
- Click Save and Continue to Edit.
- In the Idp Entity Id field, enter the Microsoft Entra Identifier value you copied in the previous section.
Example: https://sts.windows.net/12341234-1234-1234-5678-90123456789a/ - In the Metadata URL field, enter App Federation Metadata Url you copied in the previous section.
Example: https://login.microsoftonline.com/12341234-5678-9012-3456-7890ab123456/federationmetadata/2007-06/federationmetadata.xml?appid=12341234-a567-b890-c1234-d4567890c421 - Click Save.
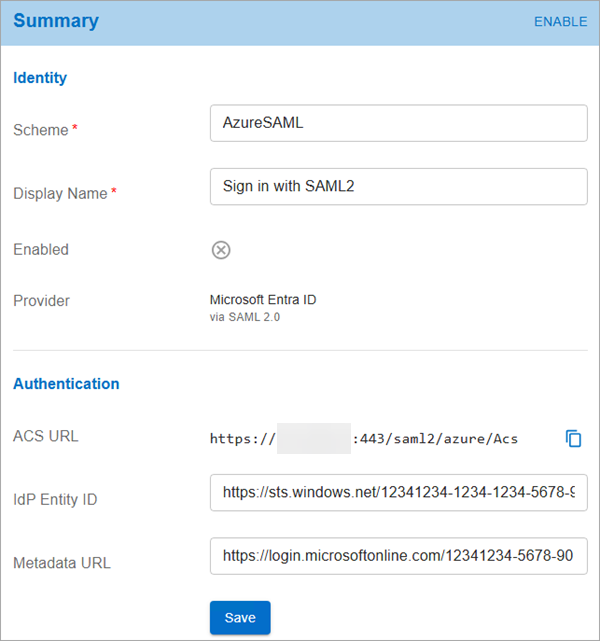
- To use this new Identity Provider, click ENABLE in the top right corner of the Summary table.
A message is displayed prompting you to restart the Identity Service for this change to take effect. Complete the remaining steps to restart this service. When an Identity Provider is enabled, the JAMS Web Client makes the input fields read-only and activates the Identity Provider. To edit it again, the Identity Provider must be disabled. - Log out of the JAMS Web Client.
- Open the Windows Services manager.
- Right-click the JAMS Identity service and select Restart.
- Go to the JAMS Web Client Log in screen. A button for this Identity Provider is now displayed under the or continue with label.
