Sequence Jobs
A Sequence Job is a JAMS Job that uses the Sequence execution method to run a series of Tasks in a defined order. Use a Sequence Job when you need multiple Jobs to execute as a coordinated flow. For example, a Sequence can extract data, transform it, and then upload it, where each step depends on the one before it. JAMS V6 users will recognize Sequences as the successor to and replacement for JAMS Setups.
This topic explains how to create a Sequence Job, build its flow using the Sequence Builder, and save and run the job.
Before You Begin
- You have access to JAMS with permissions to create and edit Jobs.
- The Jobs you plan to include as steps in your Sequence already exist in JAMS. You cannot add a Job to a Sequence that has not been created yet.
- You know which folder you want to store the Sequence Job in.
Understanding Sequence Jobs
Before building a Sequence Job, it helps to understand its two main components:
- Control Flow containers - These define how tasks execute relative to each other. A Sequence container runs tasks one at a time, in order from top to bottom. A Parallel container runs tasks at the same time. Every Sequence Job that contains more than one task is automatically wrapped in a top-level Sequence container.
- Tasks - These are the individual actions that run inside a Control Flow container. The two most common task types are Submit Job (which runs another JAMS job) and Failure Action (which defines what happens if a task fails).
You build a Sequence Job by dragging Control Flow containers and Tasks from the task panel on the left into the design area on the right.
Creating the Sequence Job
- Click Jobs from the main menu. The Jobs list opens.
- In the Folder Navigator, select the Folder where you want to create the Job.
- In the toolbar, click Add. The Add a New JAMS Job dialog opens.
- In the Job Name field, enter a name for your Sequence Job.
- In the Execution Method drop-down, select Sequence.
- Confirm that the Folder field shows the correct destination folder.
- Click Save and Continue to Edit. The Job is saved and the job editor opens.
If you click Save and Return to List instead, the Job is created but the Sequence Builder does not open. You can open it later by clicking the Job name in the Jobs list and selecting the Source tab. - Click Properties to set the properties.
- In the Execute As field, select the JAMS Credential to run this Job. This determines the account and permissions under which the Job executes.
- Click Save.
The Last Change UTC timestamp at the bottom of the page updates each time you save. Use this to confirm your changes were saved successfully. - Click Source. The Sequence Builder is displayed so you can add a Sequence Container and Tasks. Continue to the next section to build your Sequence.
Build the Sequence in the Sequence Builder
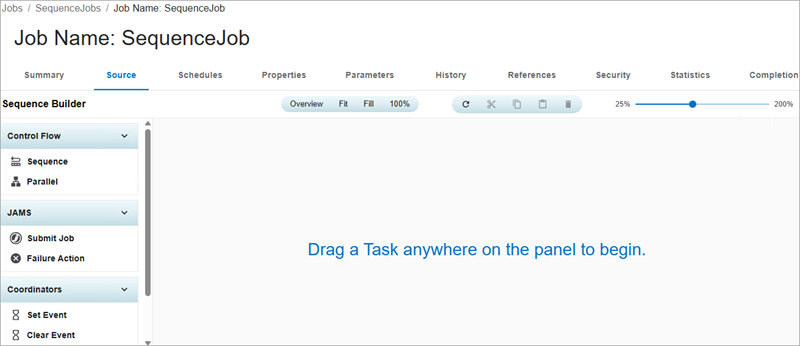
The Sequence Builder is where you define the flow for your Sequence Job. It has two areas:
- Task panel (left) - Lists all available task types, organized into groups. Drag items from this panel into the design area.
- Design area (right) - The canvas where you arrange tasks. When the Job is first created, the design area is empty and displays the prompt "Drag a Task anywhere on the panel to begin".
Adding a Sequence Container
If your process has more than one step, add a Sequence container first to hold all of your Tasks.
- In the task panel, locate the Control Flow group.
- Drag the Sequence item into the design area. A Sequence container block appears on the canvas.
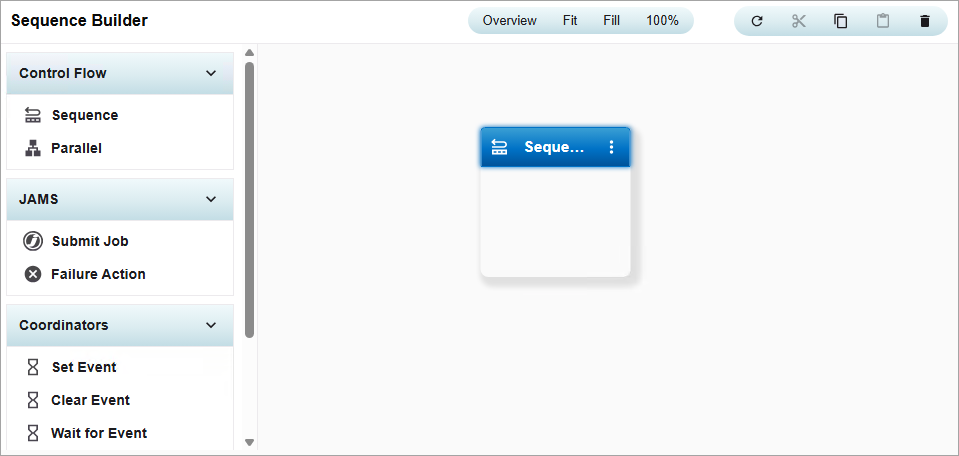
A Sequence container runs its tasks in order, one at a time. If you need tasks to run simultaneously, drag a Parallel container instead. You can also nest containers, for example, placing a Parallel container inside a Sequence container.
Adding Tasks to the Sequence Container
You can add a variety of Tasks to your Sequence Job. Each Task has its own set of Properties that you can configure.
-
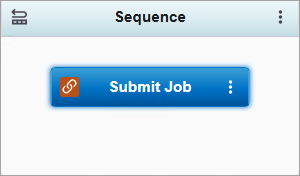
In the Task panel, locate the JAMS group.
-
Drag a Task, such as Submit Job, into the Sequence container.
-
Click
 to view and edit the Properties for the selected Task. The available Properties vary by the type.
 -
Under Submit Job, click Browse. The Job Search dialog opens, showing a list of all available Jobs organized by folder.
-
Browse or use the Filter field to find the Job you want to run at this step.
-
Click the Job name to select it and then click Select.
-
Review the remaining options in the Submit Job configuration panel:
- Schedule - Use these fields to restrict when this step can run, specify a scheduled date and time, set a scheduling priority, or place the submission on hold. Leave these fields empty if you want the step to run immediately when its turn comes in the Sequence.
- Exceptions - Defines how to handle errors. The Retry Count and Retry Interval fields control automatic retry behavior if the Job fails.
- Execute - The Execute As field controls the Credential under which this step runs. Change this only if the job requires specific account permissions.
-
Click Done.
-
Repeat these steps to add more Tasks to your Sequence.
-
Save the changes.
Changing the Order of Tasks
Tasks inside a Sequence container execute in the order they appear on the canvas, from top to bottom. To reorder Tasks after adding them, drag them to a new position within the container.
Toolbar Options
The Sequence Builder has a toolbar to let you cut, copy, paste, or delete a selected Task from your Sequence Job. The toolbar at the top of the design area provides controls for managing tasks on the canvas:

- Overview - Resets the canvas view to show the entire sequence.
- Fit - Scales the canvas so all tasks are visible without scrolling.
- Fill - Expands the canvas to fill the available screen area.
- 100% - Resets the zoom level to 100% (actual size).

- Refresh - Reloads the canvas from the last saved state. Use this to discard unsaved changes.
- Cut, Copy, Paste - Standard clipboard operations for Tasks. Use these to duplicate a configured Task rather than rebuilding it from scratch.
- Delete - Removes the currently selected Task from the canvas.

- Zoom slider (25%–200%) - Adjusts the zoom level of the canvas. Use this when working with large Sequences that extend beyond the visible area.
(Optional) - Adding a Failure Action task
A Failure Action task defines what JAMS does if a preceding Task fails. Add a Failure Action inside a container to handle error conditions without stopping the entire Sequence.
-
In the Task panel, locate the JAMS group.
-
Drag a Failure Action item into the container, positioning it after the Task it should respond to.
-
Click
to configure the Failure Action options:- Fail - The sequence stops at the failed task and does not continue.
- Continue - The sequence skips the failed task and continues with the next task.
- Not Specified - The behavior is determined by the job's default error handling settings.
-
Click Done.
-
Click Save.
Running the Sequence Job
After saving, you can run the Sequence Job immediately or let it run on a schedule.
- To run the Job immediately: Return to the Jobs list, click Submit, go to the Folder containing the Sequence Job, and click Quick Submit. The Job is submitted to the Monitor.
- To schedule the Job: Click the Schedules tab to define when and how often the Sequence Job should run. See Schedules for more information. The Job is submitted to the Monitor based on the Schedule conditions.
Go to Monitor or History to view execution status and results for each step in the Sequence Job.
Example
Your organization receives nightly order files from two regional systems: Region A and Region B. The two regional processing Jobs have no dependency on each other, so they can run at the same time. Once both finish successfully, a third job consolidates the results into a single file for the finance team. A Failure Action task (set to Fail) follows each regional job to stop the sequence cleanly if either one fails.
The four jobs used in this sequence already exist in JAMS:
- ProcessOrders_RegionA - Processes the incoming order file for Region A.
- ProcessOrders_RegionB - Processes the incoming order file for Region B.
- ConsolidateOrders - Merges the processed output from both regions into a single consolidated file.
How it Runs
When Nightly Orders executes:
- The top-level Sequence container starts and passes control to the Parallel container.
- ProcessOrders_RegionA and ProcessOrders_RegionB start at the same time and run independently.
- If both regional Jobs complete successfully, the Parallel container finishes and ConsolidateOrders starts.
- If either regional Job fails, the Failure Action runs and the Sequence then stops and ConsolidateOrders does not run. This prevents the consolidation Job from producing incomplete output.
The Failure Action runs instead of, not in addition to, the normal next step. ConsolidateOrders does not run if the Failure Action is triggered.
Additional Notes
- Tasks run in container order. Inside a Sequence container, each Submit Job Task waits for the previous one to complete successfully before starting. If a Task fails and no Failure Action is defined, the Sequence stops at the failed step.
- Jobs must exist before you add them. The Browse dialog only shows Jobs that already exist in JAMS. If a Job you need is missing, create it first, and then return to the Sequence Builder.
- Display Titles are for readability only. The Display Title you enter for a Task does not affect execution. It exists only to make it easier to read. Use descriptive titles, especially when a Sequence contains many steps.
- Nested containers are supported. You can place a Parallel container inside a Sequence container to run a subset of Tasks simultaneously while keeping overall order. Plan your container structure before building to avoid having to rearrange Tasks later.
Inherited Values
If you have values that are set within a Job and then add an override value within the Submit Job Task for the Job, the Reset option uses the original value at the Job level and not the override value. Properties and Elements are inherited from the selected Job and are displayed in the Properties and Schedule sections when you select a Submit Job Task.