Creating a Query
You can create two types of Queries in JAMS to help you filter the data that is displayed:
- Monitor Queries
- History Queries
Accessing Query Management
- Expand the Execution option in the main menu.
- Click Query Management.
Query Management screen
- Query Name – This option is the name of the Query.
- Description – This option is an optional summary of the Query and its Filters.
- Type – This option defines the screen where the Query will be used. This can be displayed in the Monitor or History screen.
- Default – This option displays a
 checkmark icon if the Query is set as a default Query.
Adding a Monitor Query
You can create a Query to filter the data that is displayed in the Monitor to help ensure you find the information you need. You can modify the steps to build additional Queries or add other Filters.
-
Open the Query Management screen.
-
Click Add.
-
In the Query Name field, enter a name for the Query.
-
In the Query Type field, select Monitor.
-
Click Save and Continue to Edit.
-
Optional - On the Summary tab, click SET DEFAULT to pin the Query to the top of the drop-down menu in the Monitor.
-
Click the Filters tab.
-
Add a Filter for the Agent:
- Click + Add Filter.
- Select a Filter from the drop-down menu. In the screen capture below, we've used Executing Agents.
- Click APPLY FILTERS. The empty Filter displays "0 filter applied".
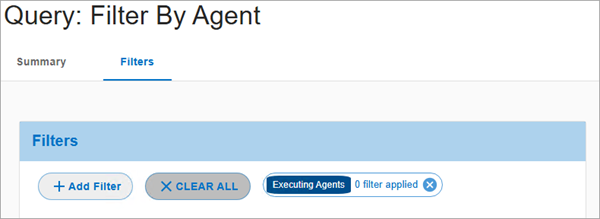
- To set a value for the Filter, click on the Filter named Executing Agents.
- Select the Agent type and Agent name.
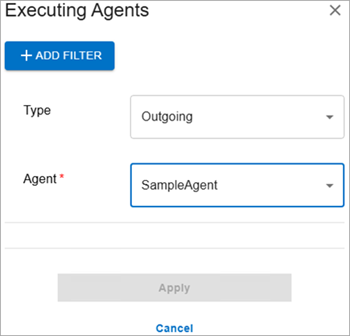
- Click + ADD FILTER. The Filter Value is displayed.
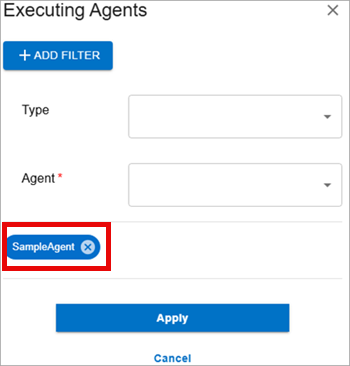
- Click Apply to add the Filter Value.
-
Repeat these steps to add additional Filters as needed.
-
Click Save. The Query is now ready to use.
Viewing the Query in the Monitor
After the Query is added, you can quickly go to it and view it in the Monitor.
- From the Query Management screen, go to the row for the Query you created.
- Click
 under the Actions column for the Query.
 - Select View in Monitor. The Monitor screen is opened with the Query selected.
- Verify that you see the desired data.
Adding a History Query
You can create a Query to filter the data that is displayed in the History to help ensure you find the information you need. You can modify the steps to build additional Queries or add other Filters.
-
Open the Query Management screen.
-
Click Add.
-
In the Query Name field, enter a name for the Query.
-
In the Query Type field, select History.
-
Click Save and Continue to Edit.
-
Optional - On the Summary tab, click SET DEFAULT to pin the Query to the top of the drop-down menu in the History view.
-
Click the Filters tab.
-
Add a Filter for the Completion time:
- Click + Add Filter.
- Select a Filter from the drop-down menu. In the screen capture below, we've used Past Window.
- Click APPLY FILTERS. The empty Filter displays "0 filter applied".
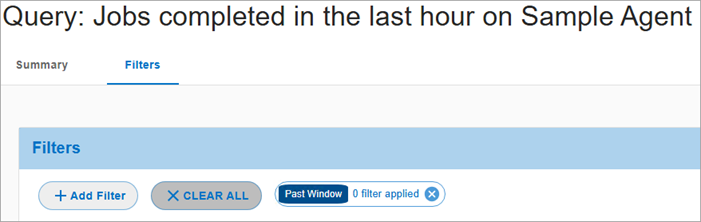
- To set a value for the Filter, click on the Filter named Past Window.
- Enter 01:0:00 for the Time and CompletionTime for the Category.
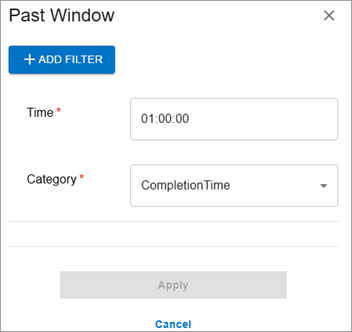
- Click + ADD FILTER. The Filter Value is displayed.
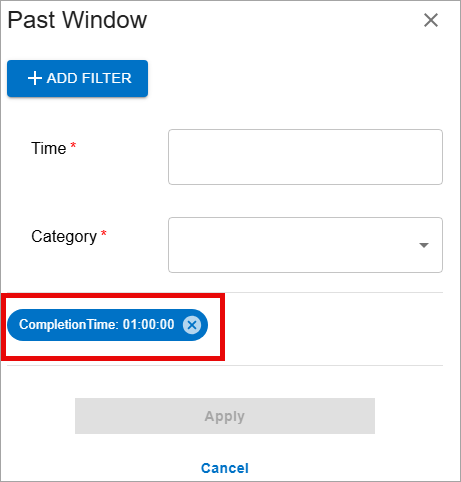
-
Repeat these steps to add additional Filters as needed.
-
Click Save. The Query is now ready to use.
Viewing the Query in the History
After the Query is added, you can quickly go to it and view it in the History.
- From the Query Management screen, go to the row for the Query you created.
- Click under the Actions column for the Query.
- Select View in History. The History screen is opened with the Query selected.
- Verify that you see the desired data.
Query Management Properties
| Summary Tab | Description |
|---|---|
| Query Name | This option is the name of the Query. |
| Query Type | This option defines the screen where the Query will be used. This can be displayed in the Monitor or History views. |
| Default | This option displays a checkmark icon if the Query is set as the default Query. |
| Description | This option is an optional summary of the Query and its Filters. |
| Last Changed | The Last Change property displays the date and time the Query was last modified. |
| Filters Tab | Description |
|---|---|
| Add Filter | This option is used to add one or more Filters to a Query. |
| CLEAR ALL | This option is used to remove all Filters from a Query. |